Creating a Leopard gecko habitat is extremely simple, and we’ll explain exactly how to do it, based upon the tremendous success we’ve had with Leopard geckos at our facility. These lizards make wonderful pets as long as you support them correctly. We’ll provide some easy step-by-step instructions, so get ready to learn!

Leopard Gecko Habitat
Step 1: Let’s start with the cage itself. Leopard geckos don’t need much space to be happy, so larger is not necessarily better. You can use a standard ten-gallon glass tank to comfortably house a pair of geckos. A simple plastic bin can work just as well, albeit less visually appealing.
Note: don’t ever keep more than one male Leopard gecko per habitat, as they will brutally fight, often immediately upon introduction. We’re talking limb-over-limb-flying-through-the-air kind of fighting. However, several females can be kept in the same cage without issue.
Leopard Gecko Substrates
Step 2: Now that you’ve selected the cage for your Leopard gecko, it’s time to decide upon a substrate. Here are some viable options, with pros and cons:
Newspaper or paper towels – This is an inexpensive, absorbent option that is also easy to replace with fresh material when cleaning. It’s not visually attractive, however, doesn’t hold moisture, and doesn’t allow digging behavior.
Green carpet or turf – A slightly more aesthetically attractive option when compared to paper towels or newspaper, but very difficult to clean as waste accumulates in the fibers and must be washed regularly. It also doesn’t hold moisture or allow digging.
Sand or gravel (or a mixture) – These substrates can be attractive and a bit more natural, although there’s a mild risk of ingestion when eating. We’ve never had an issue with this occurring though, so I wouldn’t worry about it too much. These substrates can hold moisture fairly well, especially when mixed together.
Packed dirt, soil, or cypress mulch (or a mixture) – This substrate holds moisture very well, can form a biological system for breaking-down waste, and can sustain live plants. It can lead to a bit more dirt dust dispersed around the Leopard gecko habitat, but its merits far outweigh any negatives. The most natural choice, and our highest recommendation.
Any of the above substrate options can lead to a long, healthy lifespan for your pet Leopard gecko, so don’t fret too much over the choice. Although some disagree, we do think there’s an advantage to using a substrate that retains some moisture, and thus increases humidity within the cage.
Increased humidity helps shedding go smoothly, and helps prevent dehydration. Dehydration can lead to many issues, and can shorten a gecko’s lifespan. Just because they come from dry areas doesn’t mean the habitat should be dry.

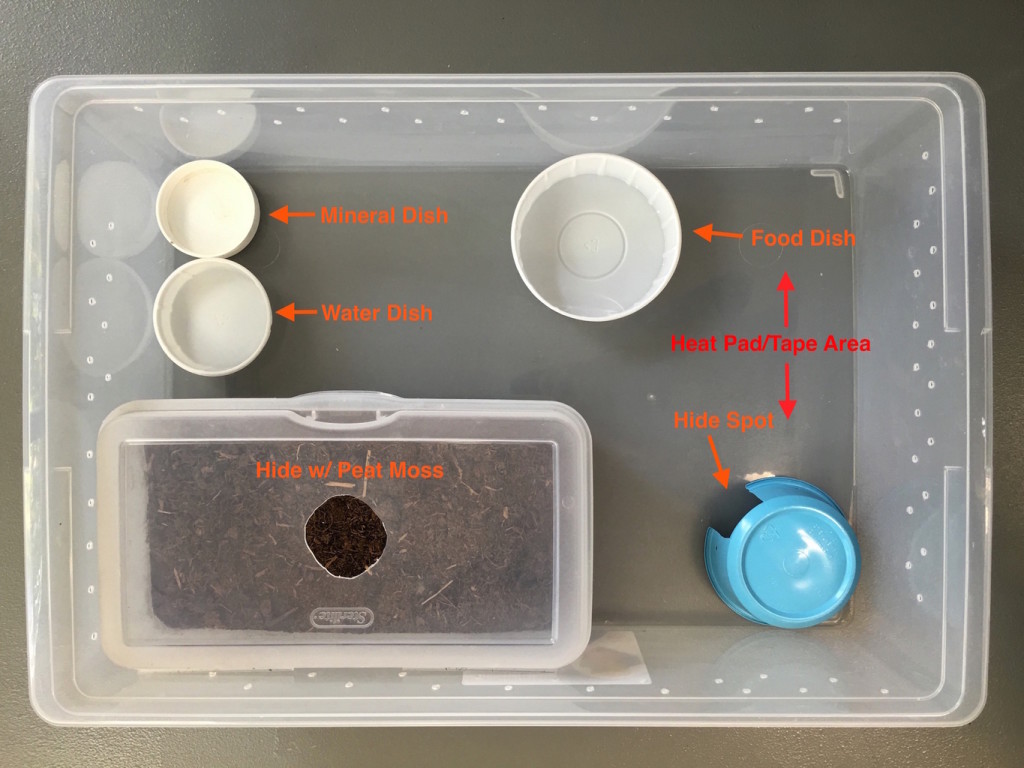
Step 3: Now it’s time for the gecko habitat furnishings. There are three mandatory items, and one optional (but recommended) item, as follows…
Hide spot – No Leopard gecko habitat is complete without a proper hide spot. It’s really important, and central to your gecko’s existence. It should be large enough to allow the gecko(s) to comfortably climb into and move around, but small enough to provide a “secure” feeling.
We use plastic shoe boxes filled halfway with slightly dampened peat or sphagnum moss with great success, as do many breeders, but you could also use something of similar size that’s a bit more attractive for a display cage, such as curved cork bark or faux-caves.
Ideally, provide two hide spots–one on the warmer end of the cage, and one on the cooler end. Your geckos will thank you!
Here’s a great hide spot that we highly recommend:
Water dish – This should be shallow and doesn’t need to be large, just 2-3 inches in diameter is perfect. But, keep the water fresh by replacing it every couple days. We recommend sterilizing the water dish once per week with a mild 5% bleach solution, or other similar product such as Virosan or Nolvasan.
Food dish – We also recommend having a shallow food dish available in the habitat. This is where you can place mealworms, superworms, or waxworms for the Leopard geckos to consume at their leisure. Make sure the worms can’t escape–this can be accomplished with virtually any smooth-sided dish. Leopard geckos often prefer to eat at night (they are nocturnal after all), so leave the food dish in the enclosure overnight.
Vitamin/calcium dish – While this is optional, we do maintain a small dish of vitamins and/or calcium in the habitat at all times. Leopard geckos will naturally lick the supplement when their bodies need more minerals.
This is especially important for babies and juveniles as their bodies are growing rapidly. It’s less important for adults, unless the females are breeding, in which case they’ll need plenty of calcium.

Step 4: Decorations such as plants (live or artificial) are a nice touch, as are climbing rocks and branches, but make sure they’re secure and won’t topple onto your gecko. Leopard geckos love to explore and investigate, so offer them a fun habitat that allows them to do so.
The best live plants for Leopard geckos are Pothos in our opinion. They are a tough, long-lived plant that is non-toxic and grows well without much light. Here’s a link for purchasing a live Pothos plant.
Step 5: One of the most common questions when creating a Leopard gecko habitat is, “How do I light the enclosure?” Fortunately, they don’t require UVB lighting and, in fact, they don’t require any lighting whatsoever. They are nocturnal, remember?
However, for viewing the enclosure and your geckos, you can absolutely install gentle lighting, but avoid the intensity of a spot or flood bulb. Fluorescent is a good option, or soft LEDs.

Leopard Gecko Heating
Step 6: Another very common question we receive is, “How do I heat my Leopard geckos?” Now, we’ve established that they’re nocturnal creatures, so heating them with a bright light bulb isn’t recommended like it is for diurnal (daytime) reptiles.
There are two options–you can heat your gecko with an infra-red bulb (in other words, a bulb that emits heat but not much light), or you can utilize the more common heat pad or heat tape, which gets affixed externally to the under-side of the habitat bottom, and not inside the actual cage.
Heat pads are fully assembled and ready to go right out of the box. You need one for each enclosure, and they are a great option if you’re housing just a few geckos or have just a few enclosures.
Heat tape is something you usually assemble yourself, and it’s a little more involved. It’s generally recommended if you’ll be setting up several Leopard gecko habitats because it’s much less expensive to buy and operate on a larger scale. We use three to four inch heat tape underneath our Leopard gecko habitats. We have a simple tutorial explaining how to install reptile heat tape available for you to peruse.

Whichever option you choose, make sure the heat source is on one end of the enclosure, not in the middle. This allows your gecko to “thermoregulate,” which is a fancy word for letting it choose whether it wants to be warm or cool. There should always be a warm side, and a cool side, of the habitat.
Also, don’t let the heat pad/tape rest on anything flammable (wood, for example), and try to keep a 1/8″ – 1/4″ gap between the heat pad/tape and the structure the cage is resting upon.
Your target temperature for the inside surface of the Leopard gecko habitat directly above the heat pad/tape is right around 87F-92F. In other words, the surface on which the Leopard geckos will come into direct contact. This is ideal and has proven to be the best temperature range by countless breeders. Don’t shut the heat off at night. We leave our’s on 24 hours per day. You can use a digital infrared sensor to check the temperature–you just point at the surface and click the button for a digital readout. Here’s a link to an excellent model:
Lastly, be sure to use a thermostat or rheostat with your heat pad/tape. If you plug the heat pad/tape directly into the wall, it will heat in an unregulated manner and can get far too hot, even dangerously so.
This is why we use an electronic thermostat, which maintains whatever temperature we input. They are about $50-$100, but if you’re looking for a more cost-effective solution, a reptile rheostat is a great option as well. Rheostats are around $15-$20 (Amazon link below) and work just like a light dimmer in a house, so you just turn the dial for lower or higher temperatures. Our most recommended heat pads are linked below as well.
Step 7: Ventilation is the final item to check off the list. Make sure there is plenty of circulation to avoid stagnant air. This will not only increase the oxygen exchange, but will also prevent the habitat from becoming too wet, humid, and smelly.
Creating a Leopard Gecko Habitat – Conclusion
Hopefully you’re now prepared to design your own Leopard gecko habitat using the above instructions. As usual, if you have any questions at all, just leave us a comment below. If you haven’t yet purchased your own gecko, you can do so now on our page of Leopard geckos for sale–we’ve got many different captive bred sizes and morphs available, and we can ship right to your doorstep!
We also have a tremendous offering of feeder insects available.
Here’s an excellent, easy-to-read book on keeping Leopard geckos in captivity, and we highly recommend you get yourself a copy. You just can’t go wrong with anything written by Philippe De Vosjoli:
You can also read a bit more general information by visiting Wikipedia’s Leopard gecko page.
Don’t miss our other articles on:
Do leopard geckos regenerate their tail?
