How to Set Up a Chameleon Cage Habitat

We love chameleons at Backwater Reptiles. In fact, we specialize in these quirky, colorful, and always fascinating lizards. If you’re wondering how to setup a chameleon cage habitat or enclosure, you’ve come to the right place.

We’ve bred and hatched thousands of chameleons over the years, everything from common species to extremely rare. We’re experts on everything from breeding, feeding, and even hydrating these reptiles and we’re going to pass our knowledge on to you!

Many people are drawn to the bright complexions of chameleons and their ability to alter their color, but they don’t always take the time to research and find out the specific needs of their new pet lizard.

What might seem like common sense to experienced herpers is often like learning a foreign language to new reptile enthusiasts. They often need help getting started. That’s where this blog article comes in!

Not only will we provide written instructions on how to set up your pet chameleon’s enclosure, we’ll explain to you why things need to be done this way. And we’ve even thrown in a video tutorial for good measure!

So read on to find out how we set up our chameleon cages at Backwater Reptiles as well as learn some tips and tricks even if you are an experienced chameleon owner.

Overview of setting up your chameleon’s cage

Before you get into the nitty gritty specifics as detailed in writing below, we wanted to give you the chance to watch a video we made detailing how to set up the perfect enclosure for your pet chameleon. Watch the tutorial video and then read our FAQs for even more details!

What type of cage should I get for my chameleon?

Unlike many species of reptiles which will thrive in glass tanks, all chameleons (with the exception of the pygmy chameleon) should have a mesh or screen cage.

Although there are cages that have mixed glass and mesh walls, we recommend an enclosure that is completely screens with no glass walls to ensure your pet chameleon’s optimum health.

Are you wondering why your chameleon should have a mesh cage? The answer is simple really – ventilation. A glass cage prevents air from circulating properly and creates a stagnant environment within the chameleon’s home.

If the air doesn’t circulate properly, your chameleon can develop a respiratory infection due to stagnant, humid air. Once an infection takes hold, they’re not easy to eliminate.

If you’re wondering where to find a specialty chameleon cage, you can purchase them right on our website–the same ones we use so successfully. Each chameleon page has a supplies section if you scroll-down just a bit.

Many types and brands of chameleon cages exist, but we usually go for ones that give easy access to the animal with secure latches and swinging doors on the front. Some will also have sliding screen tops, although we prefer the front access kind.

simple chameleon cage setup
This is a classic chameleon cage. Notice how it has an aluminum (no corrosion) frame and all screen walls. Chameleon cages shouldn’t have glass walls to encourage air circulation.

Usually we also prefer mesh cages that have two separate swinging front doors – a larger top door for gaining access to your chameleon itself and a smaller, lower door. The lower door is opened to slide out your cage liner so you can wipe up dead insects and any feces that might collect.

Backwater Reptiles has a simple selection of cages and cage requirements that you can purchase at the same time you buy your pet chameleon. As mentioned, just scroll down a bit on any of our chameleon pages.

What size enclosure should my chameleon have?

Most chameleons are relatively small lizards with the exception of a few species such as Oustalets chameleons (Furcifer oustaleti), Parson’s chameleons (Calumma parsonii), and Mellers chameleons (Chamaeleo melleri). This means that you can house most species in small to medium-sized cages.

Babies and juveniles obviously don’t need as much space as their adult counterparts. In fact, we recommend smaller cages for babies because it can be hard for them to find their food source (i.e. catch the tiny crickets and fruit flies that they eat) in such a large cage.

However, there are certain instances where you can get one size cage and keep it for the entirety of your chameleon’s life.

Most common species of adult chameleons that are kept as pets such as Jackson’s chameleons (Chamaeleo jacksonii), Panther chameleons (Furcifer pardalis), and Veiled chameleons (Chamaeleo calyptratus) do just fine with a mid-size cage.

We recommend an enclosure that is eighteen inches deep by eighteen inches wide and thirty-six inches tall for sub-adults and adults. However, smaller cages can be used successfully.

Panther chameleon cage
Here’s one of our more prolific Ambilobe Panther chameleon breeders (a male). Females are much less colorful–you can see one on the left side of the picture.

Notice that the cage we recommended is more tall than it is wide? That’s because chameleons are arboreal species and they will spend most (if not all) of their time up in the branches and foliage you provide for them. You’ll very rarely, if ever, see your chameleon on the floor of the cage.

This means that height is far more important than floor space when keeping a chameleon’s life style in mind. More height means that the chameleon has more room to thermoregulate.

It can choose to be up high close to the heat source and UV lights to bask or it can descend further down into the enclosure to cool off.

What kind of accessories are safe to put inside my chameleon’s enclosure?

When it comes to decor and accessorizing your chameleon’s cage, we’re of the mindset that natural is beautiful. In other words, although it might not harm your chameleon to add cute little cage decorations, there certainly is no benefit to doing so.

We prefer our set ups to mimic the conditions of the chameleon’s natural habitat as closely as possible, which means plants and vines are our go-to accessories.

We recommend either artificial or living plants as your main cage decor. This is both practical and aesthetically pleasing. Chameleons needs lots of foliage to climb on as they are arboreal lizards and having plants inside the cage will satisfy this need.

Many cage set ups actually come with some artificial vines and foliage and these are perfectly acceptable options.

If you do choose to go with living plants, please make sure that you are not buying a toxic plant. Below is a list of a few species that we have used successfully in our set ups at Backwater Reptiles:

Hibiscus – This tropical plant has fairly large, green leaves and very gorgeous flowers when it blooms.

hibiscus
This is a mature hibiscus plant growing in the wild, but you can purchase much smaller, potted hibiscus plants from your local hardware store.

Ficus benjamina –  This species of fig is commonly known as the weeping fig, Benjamin fig, or even simpler yet, the Ficus tree. Although this “plant” will eventually grow into a tree, if you purchase a young one at a hardware store, it will last you many years inside your chameleon’s enclosure.

Pothos Plant – Considered by many to be a classic house plant, the pothos plant is very easy to care for. It will grow quickly and “outward” unless you give it something to grab on to though, so we recommend a sturdy stick or branch to make it grow upwards within your chameleon’s cage.

Schefflera arboricola – We highly recommend this species if you want living plants in your chameleon cage. This species does very well under stress and doesn’t require much care to thrive.

The verdict – although we think living plants are more aesthetically pleasing, they can also add another layer of care to your chameleon set up. Not only will you have to care for a chameleon, but you’ll also have a plant to water and provide sunshine for.

Plastic foliage requires no additional care and is also easier to spot clean for feces and dead bugs.

What type of lighting and temperatures will my chameleon need?

Make sure that you provide a UVB light for your chameleon. It should sit atop the cage. You will also need to make sure that the foliage and climbing areas within the enclosure allow the chameleon to be within six inches of the UV light.

This distance is important because you don’t want to allow the chameleon to get too close to the light because it could unintentionally burn itself. But on the opposite side of the spectrum, if your chameleon can’t get close enough to the light, it won’t be able to properly absorb the rays and synthesize the vitamins that help it to develop strong bones.

At Backwater Reptiles, we prefer to use Zoo Med Reptisun 5.0 bulbs. We’ve had great success with these bulbs and we highly recommend them whenever people ask us. You can purchase the ones we use right on our website.

One quick note regarding all UV lights, whether they are used for a chameleon cage set up or for some other reptile – they need to be replaced every nine to twelve months. They lose their efficacy if you don’t replace them. We recommend changing sooner rather than later if you ever have doubts.

As far as temperature is concerned, we’ve found that room temperature tends to be just fine for most species of chameleons unless your ambient room temperature drops below seventy or above eighty-five degrees Fahrenheit.

You can provide a basking heat lamp in addition to a UV light. The ambient temperature around the basking area should be between one hundred and one hundred ten degrees Fahrenheit. You should invest in a reptile heat gun in order to monitor both your ambient cage temperature as well as your basking spot temperature.

Does my chameleon need a water dish?

The shortest answer to this question is no, your chameleon does not need a water dish.

Chameleons actually don’t drink water from a bowl. In fact, they will die of dehydration before drinking water from a dish. They simply won’t recognize it as a source of hydration.

How then do you get a chameleon to drink water and stay healthy and hydrated? The answer is simpler than you might think. All you need to do is regularly mist inside the cage or provide some sort of drip system on top of the cage.

Because we have many cages and many chameleons to care for, at Backwater Reptiles we have automatic misters called monsoons on top of all our chameleon enclosures. However, these are rather pricey misting systems and we only really recommend them if you have multiple animals and a very busy schedule.

If you just have a single chameleon or even a breeding pair living in a single enclosure, there are many ways to make sure your chameleon gets water. The first way is to simply manually use a spray bottle and mist the cage several times per day.

You’ll want to make sure that in addition to creating humidity, you are spritzing in areas to collect water droplets on the leaves.
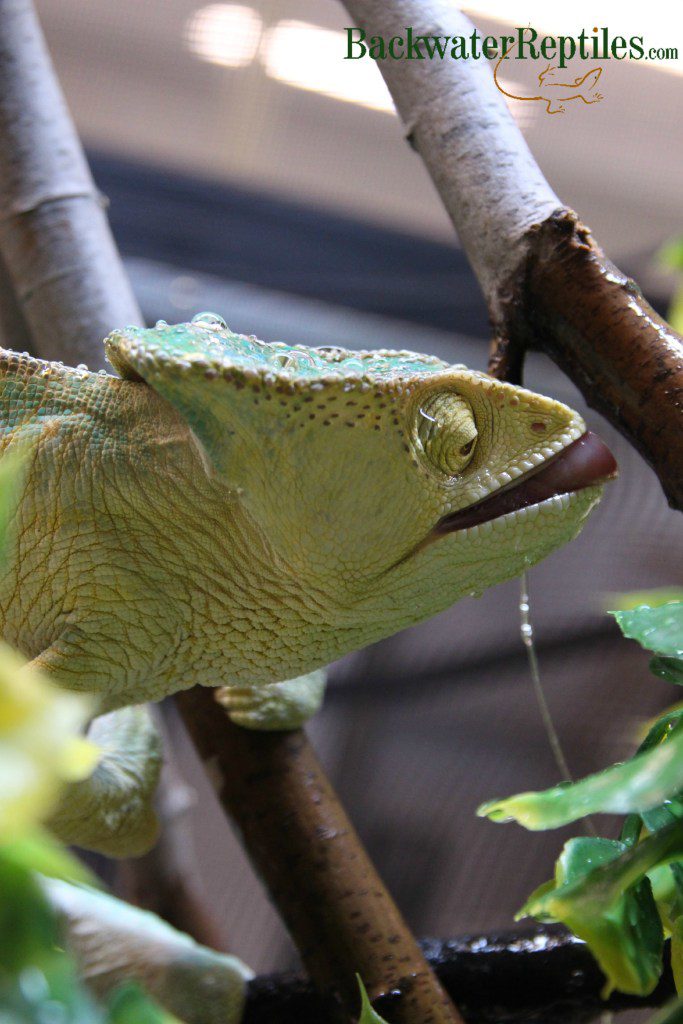
chameleon drinking water
This Parson’s chameleon is lapping up water that has collected on the foliage in its enclosure.

You can also buy an inexpensive drip system from just about any pet store. These drip systems are usually tubs with a spout that allows you to control the intensity of the drip.

And if you’re real thrifty, you can even hydrate your chameleon using a small, plastic, disposable cup! All you have to do is poke a small hole in the bottom of the cup, fill it with water and set it in a place atop the mesh cage where it will drip onto leaves and create small pools of water for your chameleon to lap up.

So, we’ve learned that you can choose to hydrate your pet chameleon using several methods – manually misting, setting up an automatic mist system, or creating some sort of dripping apparatus.

However, one thing is definitely clear – a water dish is not necessary and your chameleon will not drink from it.

Conclusion – Setting up a chameleon cage

Chameleons make fantastic and rewarding pets. They are so fun to show off to friends and family and many can even be trained to eat from your hand!

Setting up a proper environment where they can thrive is paramount. We hope that this blog article has helped you out with your own chameleon’s set up, whether you’re brand new to keeping chameleons or an experienced herp enthusiast.

 

What Gender is My Panther Chameleon?

You might want to know what gender your panther chameleon (Furcifer pardalis) is for many reasons. Maybe you want to begin a breeding project. Perhaps you got a new family pet and you are trying to decide on a name. Or maybe, you’re just plain old curious.

Never fear – at Backwater Reptiles, we breed, feed, handle, and care for Panther chameleons on a daily basis, and we’re prepared to help you be able to tell if your Panther is a lady or a gent.

Color

The biggest indicator of adult Panther chameleon gender is color. In the wild, juvenile and adult males use brilliant colors to attract mates as well as defend territory against rival males, so bright, bold colors are the number one indicator that you have a male chameleon.

Blues, greens, and deep reds are all colors that are primarily displayed by adult males. Females on the other hand, tend to be duller and will usually be peach, pinkish, tan, grey, or brown in tone.

male furcifer pardalis
This is an adult, male Panther chameleon. He is very colorful, displaying brilliant blues, greens, reds, and whites.
female chameleon
Here is an adult female Panther chameleon. She is very brownish, peach in color with a hint of an orange stripe on her side. What a stark contrast to her male counterpart!

Tails 

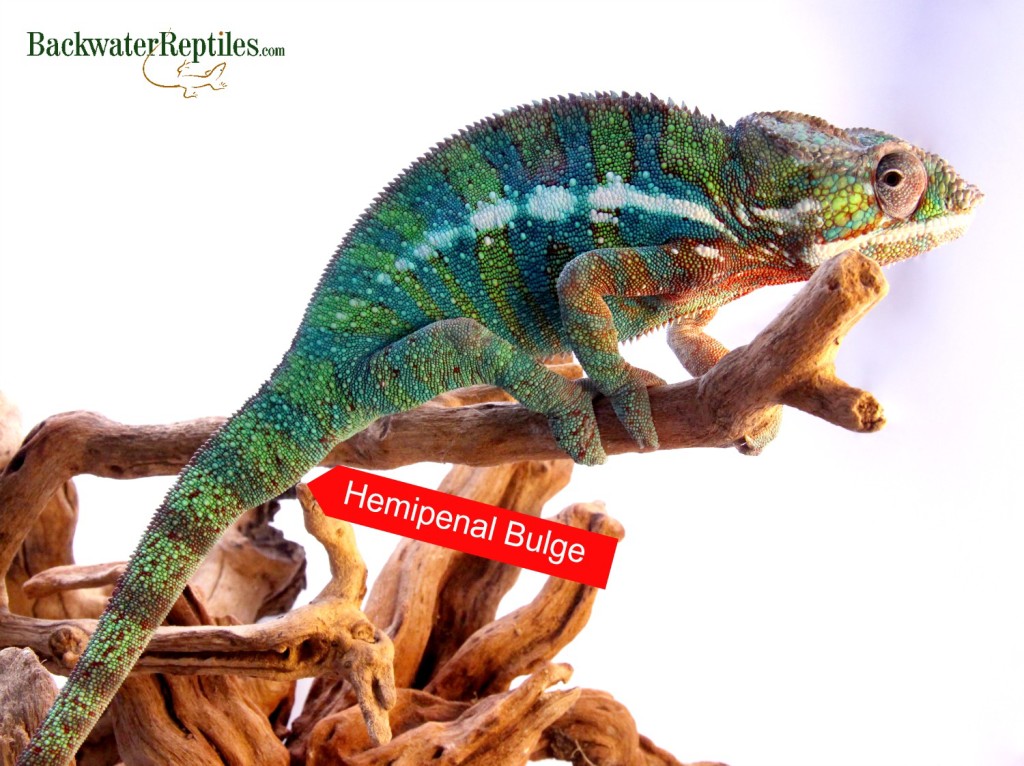
Although male chameleons don’t have external genitalia like mammals do, they do still have a  trait that distinguishes them from females called the hemipenal bulge. The hemipenal bulge is a natural bulge at the base of the male’s tail where his reproductive organs are located.

panther chameleon hemipenal bulge
The red arrow is pointing to the male’s hemipenal bulge, which is noticeable from a young age, but does grow as the chameleon matures.

This trait is noticeable very early on in the chameleon’s life cycle. At even a young age, male Panthers have fatter and thicker tails bases than females. The females will actually have a small indent where the cloaca is located at the base of the tail.

Rostral Process (AKA Nose Ridge or Bump)

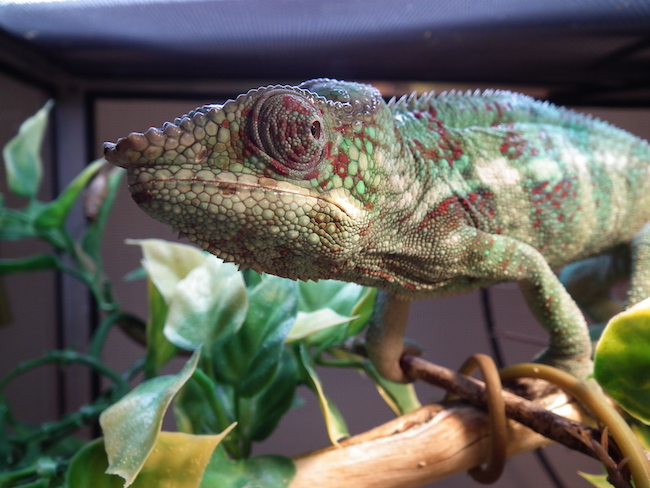
Once the males have grown a bit, they will begin to develop a ridge or bump on their nose that extends along back to both eyes. This will become quite large and pronounced as the males become fully mature.

Females on the other hand, might develop very tiny rostral processes, but they will always stay small, especially when compared to that of a male.

male panther chameleon rostral crest
Here’s a close up view of a male Panther chameleon’s rostral process. This ridge that forms a bulbous sort of “nose” on the males can be present in females, but will be much smaller.

Size

Full grown male Panther chameleons will grow to be anywhere from twelve to eighteen inches long. Females will be smaller – anywhere from ten to fourteen inches long.

female panther chameleon gender
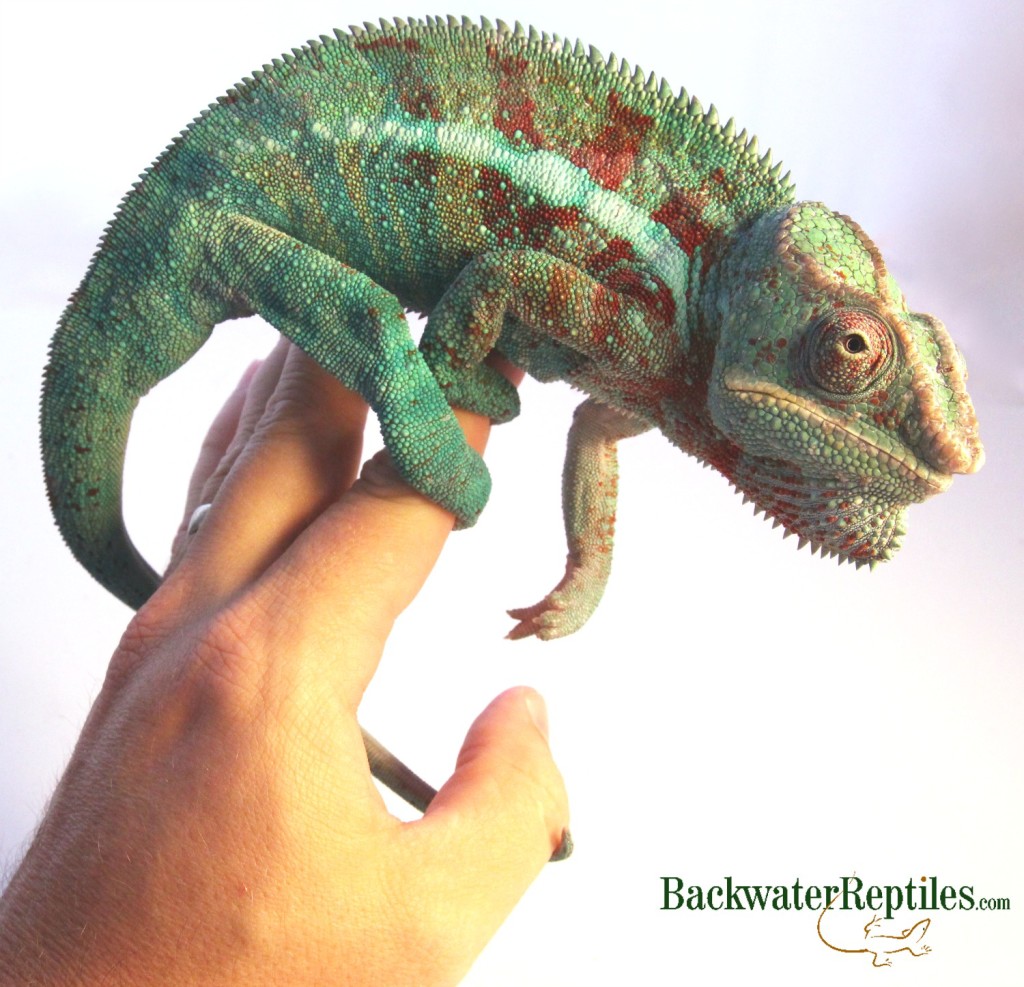
This photo shows an adult female Panther being handled.

Males are also heftier and bulkier than females in general. Their tails will not only have bulges, but will be thicker in overall girth when compared with a female’s.

Conclusion

Sexing a baby Panther chameleon can be tricky. It’s best to wait at least a month or month and a half sometimes when determining gender. But if you are dealing with adult Panthers, the process is much easier as males and females are very different in terms of size, color, and even morphology to a certain extent.

If you are interested in owning your very own Panther chameleon, Backwater Reptiles offers both male and female Panther chameleons for sale. We also have a very informative blog article detailing how to breed Panther chameleons if you are interested in producing some cute little babies of your own.

How to Breed Panther Chameleons

Have you ever wondered how to breed Panther chameleons? Well you’re in luck, because I’m going to explain the entire process to you, from initiating mating through successful incubation of the eggs–and everything in between.

I’ve bred many generations of Panther chameleons (Furcifer pardalis) and have acquired a significant amount of knowledge about these incredibly beautiful and ultimately rewarding reptiles.

breeding panther chameleons
Here’s one of our breeder male Panther chameleons (Furcifer pardalis) with striking blue coloration.

Selecting a male and female Panther Chameleon

The first step is to purchase a male and female Panther chameleon. The “locale” doesn’t really matter, although I prefer keeping the lines pure, some may want to experiment with “crosses,” and if that’s your desire, go for it.

A “locale” references the area of Madagascar from which your type of chameleon originates, such as “Ambilobe,” “Nosy Be,” “Nosy Faly,” and so on. They are all compatible, and a “cross” is when you breed one locale to another local, such as an Ambilobe with a Nosy Be.

We offer top quality, captive bred Panther chameleons for sale if you would like to start out with some quality stock. Regardless of where you purchase, we highly recommend starting out with juveniles, but not adults. The reason is, with juveniles, you can be sure they are raised correctly with proper care and nutrition, which prepares them successful breeding. Avoid wild caught specimens.

How to breed panther chameleons
Here’s our first ever breeder male Panther chameleon from years ago. He’s still a sub-adult in this picture, and doesn’t yet have the normal adult coloration. Many believe chameleons gain more color with each passing month, for their entire life.
colorful panther chameleon
Here’s the same male Panther chameleon (Furcifer pardalis) a couple months later.

Panther Chameleon Enclosures

If you’re not overly familiar with how to keep chameleons successfully in captivity, please reference our detailed chameleon care sheet. Going forward, this article assumes you understand how to raise a chameleon, including subjects such as feeding, hydration, lighting, etc.

Before breeding your chameleons, we highly recommend keeping your Panther chameleons in separate screen cages. We sell screen cages and complete screen cage kits as well (just scroll down on any of our chameleon pages to purchase). The reason for this is that virtually all chameleons can become very stressed having to share an enclosure with another specimen–it’s just not their nature. While it is possible to raise them together, it is not advised and will likely shorten their lifespan.

Keeping your chameleons in separate enclosures also makes breeding easier, as the old adage goes, “Absence makes the heart grow fonder.”

ambanja panther chameleon
Here’s one of our breeder male Ambanja locale Panther chameleons.

Here’s a video where I detail exactly how we set up our chameleon cages for breeding. We sell this exact kit on each chameleon page of our website–if you purchase a kit with your chameleon, we guarantee the chameleon for a full 30-days!

Panther Chameleon Breeding/Mating

Once your chameleons reach about one year in age, it’s time for the introductions. Breeding them at six months is possible, but it’s tougher on the female’s body, so it’s best for the long-term to wait until they’re both adults. She’ll live longer and will have larger egg clutches.

Some breeders believe putting the female into the male’s enclosure is best, as he is supposedly going to be more territorial and will want to display his dominance, but we’ve actually had great success placing the male into the female’s enclosure as well. At the end of the day, it probably doesn’t matter much.

One trick to get the male fired-up is to hold a mirror in front of him for a minute or two. He’ll think it’s another male, and it will ignite a territorial reaction in him. If you haven’t guessed, one show of dominance is mating, or being the alpha male. Although, we’ve also found that using a mirror isn’t usually a necessary step.

Important note: a peach/pink colored female is generally ready and receptive for mating.

Once you’ve placed the female into the male’s enclosure (or vice-versa), pay close attention to the female. You’re looking for signs that she’s either receptive to mating, or not receptive. Watch her intently, and once she spots the male, she’ll either calmly continue slowly walking or swaying (this means she’s likely receptive), or she’ll put on a defense display by widening her body and hissing or frantically trying to run away (or both). If she wants to escape and is obviously is distress, remove her–she’s just not ready.

If she is receptive, let nature take its course. Mating should begin in minutes, and will last anywhere from five to thirty minutes or so. We usually leave them together for 12-24 hours as mating may take place more than once.

panther chameleons mating
Here’s the above pictured male preparing to mate with one of our females. The male will always be on top, and the female will always lift her tail. It’s usually a fairly gentle process.

Is your Panther chameleon gravid?

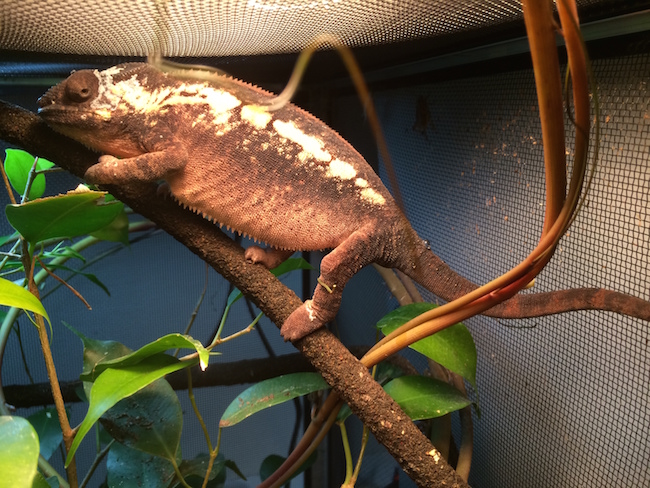
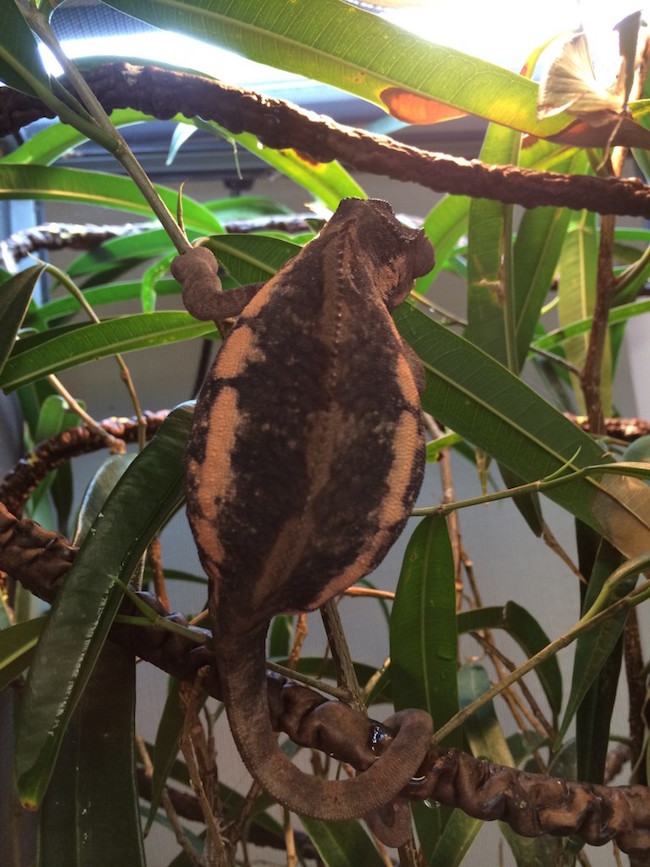
So, your pair has mated–but did it work? Well, you’ll find out within about 24 hours. If the female is now gravid (pregnant), she will turn dark brown, with a bright peach stripe down each side. It’s unmistakeable.

gravid panther chameleon
Here’s what a freshly gravid female Panther chameleon looks like. Note the dark brown base color with a bright peach strip along her side.
gravid female panther chameleon
Here’s another gravid female, but much further along in the gestation process. Notice the dark brown coloration and peach stripes, as well as a hugely swollen belly (the developing eggs).

Gestation is the amount of time between mating and laying eggs. Our Panther chameleons average around 3-4 weeks, but sometimes up to 5-6 weeks. During this time, feed her plenty (as much as she’ll consume), and dust the feeders with a high quality calcium supplement once to twice per week.

Preparing for Egg Laying

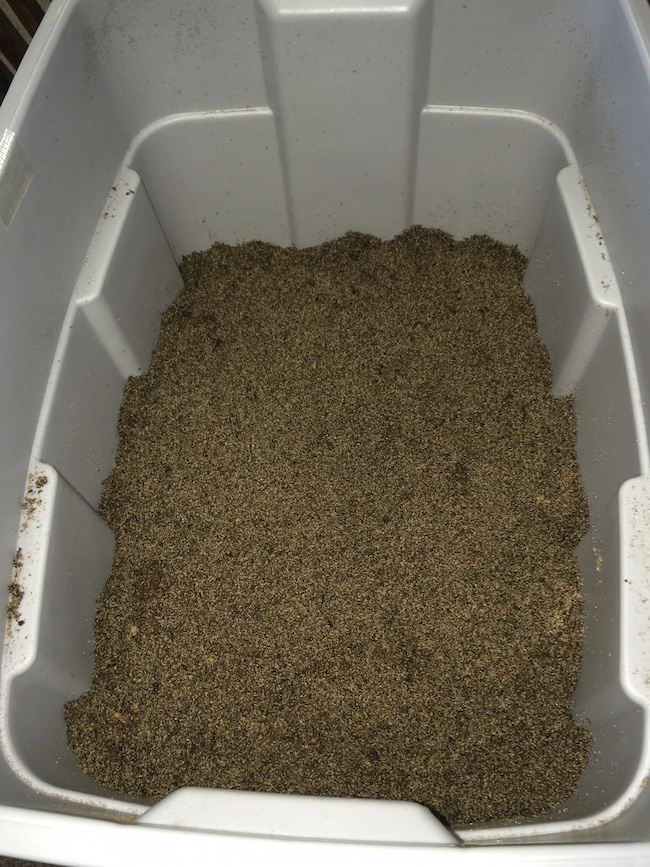
We always have a few laying bins prepared, but even on a small scale, make sure you have a bin ready for your female before she’s ready to lay. We use simple plastic bins from Home Depot, which are around 24″ x 16″ x 18″ (L x W x H). While you’re at the store, purchase a bag of peat moss, and a bag of sand.

Fill the bin with approximately 8-inches of a mix of peat moss and sand, at an approximate ratio of 3:1, respectively. Now, add enough water so that you can clump the peat/sand mix in your hand, but avoid making it wet. If you squeeze a handful of the mix, there shouldn’t be any water dripping from it. Now, press downward on the peat/sand mix surface firmly with your hand so that its all well packed. This makes it easier to hold a tunnel during the digging process.

The point here is to make it damp enough to hold the tunnel that the female Panther chameleon will dig, and damp enough so it doesn’t dry-out the eggs in case you can’t get to them immediately.

chameleon laying bin
Here’s an example of a chameleon laying bin with the moistened and packed peat moss and sand mix we use.

Laying the Eggs

Ok, so you’ve bred your Panther chameleons. If you’re wondering how to tell when the female is ready to lay eggs, no worries, it’ll be obvious. The moment you see her pacing the floor of her enclosure, you know it’s time. Gently move her into the laying bin. We then place the cover of the bin over about two-thirds of the top, leaving most of it dark, but about a third of it lit.

Leave the female alone, and avoid checking on her often as it can spook her and prevent her from laying her eggs (she thinks you’re a potential predator waiting for eggs to eat). We set up remote cameras on our laying bins so we can check from our mobile phones to observe their progress.

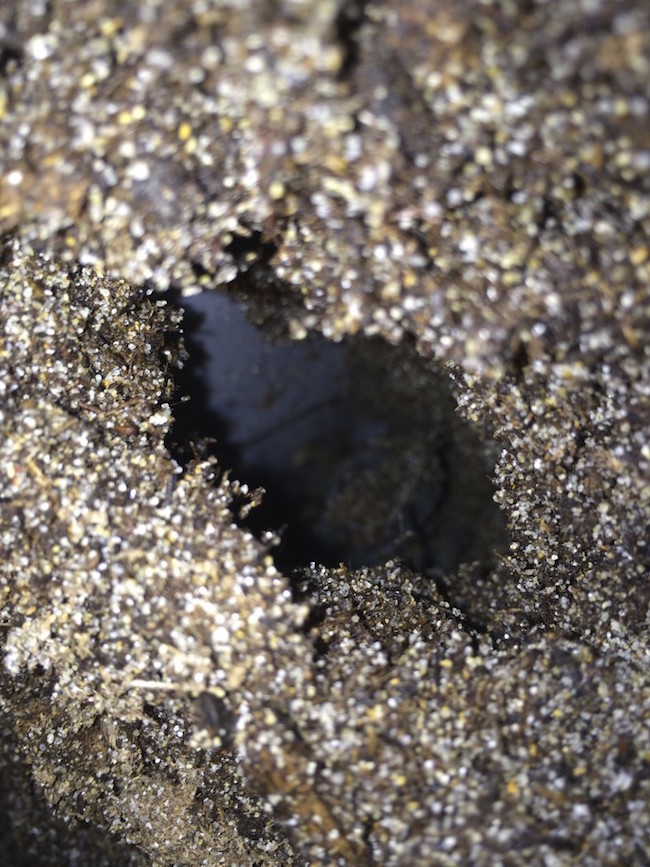
She will potentially dig a couple test holes, but will soon find a spot she likes and will dig a tunnel about 6-8 inches deep, at the end of which she’ll lay her eggs, upwards of 35 of them if she’s in peak condition. The vast majority of the time our’s will choose a corner of the bin to dig a tunnel.

chameleon egg tunnel
Here’s a tunnel containing one of our female Panther chameleons preparing to lay her eggs. Notice how the dampened peat/sand mix holds a tunnel nicely.

When she’s done, she’ll turn around and start burying the eggs. She’ll re-fill the entire tunnel, and will pack it down and disguise the surface so well that you’d never even know where she laid them–it’s impressive.

Remove the female, and place her back into her enclosure. Start a slow drip in her enclosure so that she can rehydrate, as she’ll be exhausted. She may want food immediately as well, so offer a few crickets to see how she responds. You don’t want to annoy her with feeder insects if she’s not hungry and just wants to drink and rest.

Now, assuming you know the corner where she buried her eggs, start gently swiping the peat/sand mix away, digging very slowly. I use my fingertips and use a back-and-forth motion, almost like you’re dusting sand off something. We’ve never damaged a single egg (out of thousands) using this method. Don’t ever dig with a tool–you’ll lose the sensitivity of touch.

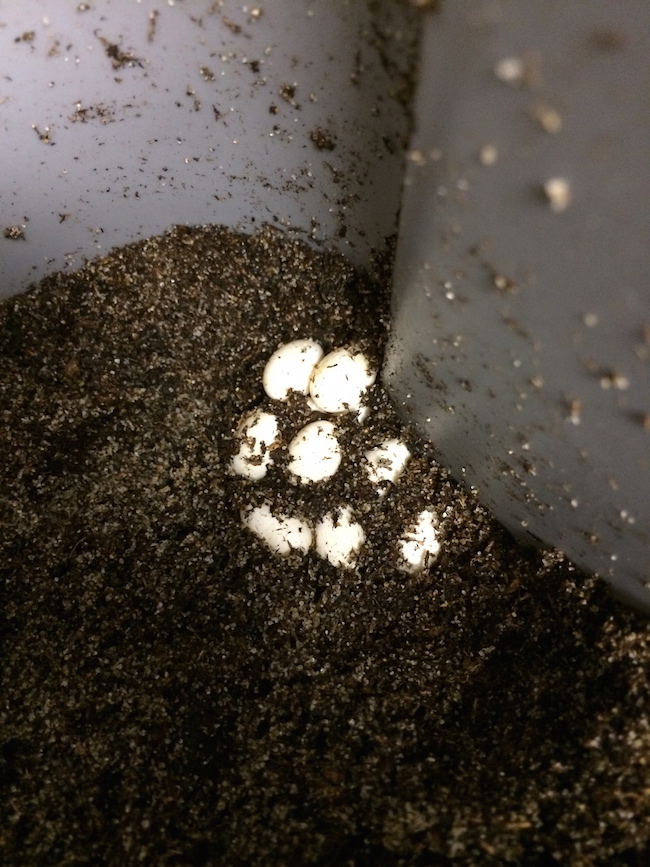
Eventually, you’ll see a flash of white–you’ve found the eggs. It’s exhilarating every single time–it never gets old! Now slow down and very carefully continue dusting the surrounding peat/sand mix away so that you can start harvesting the eggs.

panther chameleon eggs
Here’s what the eggs look like when you discover them. The eggs are laid in a round/oval clump, although they don’t stick together. Believe it or not, there are 34 eggs in this clutch.

Handling the Panther Chameleon Eggs

It’s time to bear the fruit of Panther chameleon breeding! Carefully remove the eggs, one at a time. Make sure you don’t rotate them around their axis–it’s vitally important you keep the eggs in the same position (there’s an air bubble inside each egg that settles at the top–rotating the egg after laying can potentially kill the embryo).

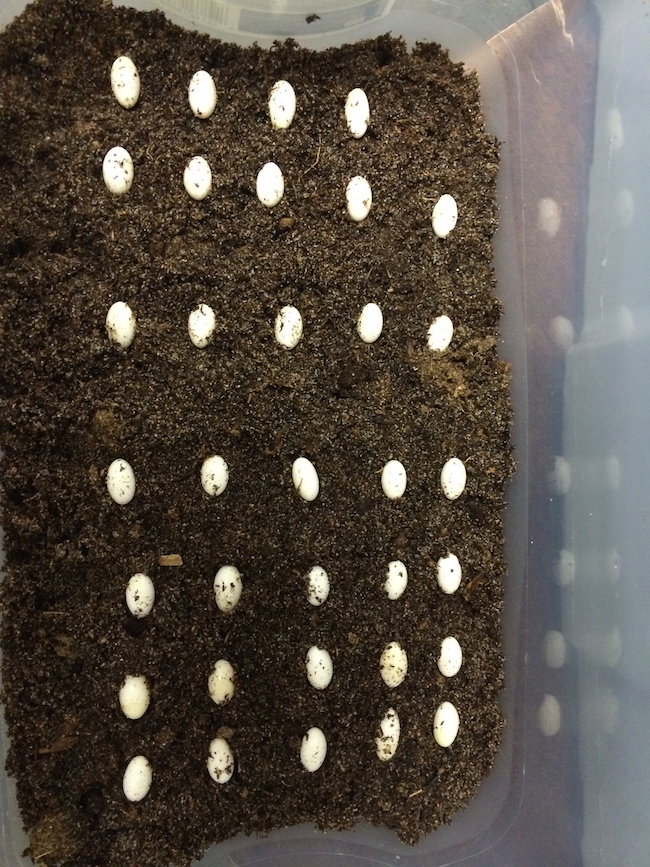
Place the eggs into the incubation container (we use plastic shoe boxes with no air holes). In the below picture, we used the same peat/sand laying mix with success, but we now use Perlite, mainly because it’s cleaner and more sterile. If you’re using Perlite, add enough water so that the perlite is barely damp, but definitely not wet. The eggs are pretty tough, so there’s generally plenty of leeway. We almost always get 100% hatch rates with our Panther chameleons. If you’re using vermiculite, dampen it enough so that when you squeeze it with your hand, it clumps but doesn’t drip.

furcifer pardalis eggs
Here are the resulting eggs from the above clutch, 34 in all.

Incubating Panther Chameleon Eggs

As mentioned above, we use plastic shoe boxes and we do not drill air holes. We’ve found that adding air holes does not increase hatch rate percentages, and adds the risk of the eggs dehydrating. In nature, when they are buried six inches in the dirt, they’re not getting any air.

We recommend that you avoid buying a commonly available reptile egg incubator, as we have found they are unreliable, and experience quick temperature swings. Specifically, we’re talking about reptile egg incubators in the $100-$300 range. If you want to spend $1,000 or more, you can get a good quality incubator.

Do you know what temperature we incubate all our chameleon eggs at? Room temperature. That’s right, we keep the plastic shoe boxes stacked in a room, and let the natural room temperature do its thing. This means a daily fluctuation of around 66F to 76F, depending upon the season. Our hatch rates are sky-high, and its free. Don’t overcomplicate things.

The dangerous part of reptile egg incubation is a quick temperature change, not a slow one. Chameleon eggs are actually pretty tough as long as rapid temperature changes are prevented. This is why the reptile egg incubators are dangerous in our opinion–they can quickly increase or decrease in temperature, and for no apparent reason.

nosy be panther chameleon
Here’s one of our sleeping male Nosy Be Panther chameleons. This locale attains an almost iridescent pastel blue coloration.

Hatching Panther Chameleons

Let’s continue using the above clutch in our article on how to breed Panther chameleons. The eggs were laid on November 11th, and started hatching on May 18th of the following year. That’s an incubation period of a little over six months, although it can take a little longer in some cases. The eggs continued hatching for a period of about a week.

Quick tip: Resist the temptation to remove the first hatchlings as soon as they appear. The reason is, eggs seem to communicate. Once one starts hatching, it seems to somehow signal the other eggs to start hatching too. I’m not sure if it’s chemical, but there’s definitely some sort of phenomenon that occurs. Let the initial hatchlings wander around in the laying bin for a day before you remove them.

One sign to watch for during incubation is what’s called “sweating.” This is when an egg appears to sweat, which means a clear liquid beads-up on its surface. This is your signal that hatching is about to begin!

panther chameleon hatching
Here’s the result: a baby Panther chameleon hatching. It’s a beautiful and satisfying sight to behold. Note: the bottom-right egg is sweating.

Summary – How to Breed Panther Chameleons

We hope you’ve enjoyed reading our in-depth article on how to breed Panther chameleons. It’s a process that’s not only easy, but extraordinarily rewarding. We encourage you to use our guide to try to breed your own Panther chameleons, and don’t forget that you can buy your first pair on our website by visiting our Panther chameleon page.

If you purchase from us , we’re always available for questions and breeding guidance. Also, don’t forget that you can buy the exact chameleon kits we use and you’ll get a free 30-day guarantee on your new chameleon.

Here’s a quick summary of our chameleon kit promotion:

If you’d like to read some high level information on this species, check out the Wikipedia Panther chameleon page.